Followers

Monday 24 December 2012

LiM - Drinks

For the first time in ages I have made time to take part in the Less Is More card Challenge.  The topic for the next 2 weeks is:

"This challenge will last for two weeks over the festivities and we have decided to start our Christmas celebrations with a whizz and have chosen
DRINKS 
as our recipe.
You can choose tea, coffee, water, sodas, alcohol of course if you wish, in fact any drink at all..."
 
I was not really sure what to do, but happened to find an image that I had printed from the Joanna Sheen CD 'If Flowers Could Talk'  This image features a cup of tea.
 
 
I matted the image on a piece of patterned paper and used a purple ProMarker to create the boarder.  I then decided that I want to use the 'Just a note to say...' sentiment, but I did not want to use Black ink, I wanted it to match the colour scheme (purple). 
 
So... I decided to try and use my ProMarker to colour the stamp.  Well I can say that it worked (but I don't think I would want to try it with a larger stamp), using the thick end of the pen I was able to colour the stamp in one swipe and it stamped OK.  The only down side is that my stamp now has a pink tinge to it. 
 
Does anyone know if ProMarkers can be used with stamps????


Thursday 20 December 2012

How To... Create a Gift Card Holder (Number 3)

Ok, so I can't decide which type of Gift Card Holder I like.... This one is a bit more like a gift & can be customised for both Gift Cards & Tea Bags (see more about the Tea Bags at the end of this post).

This is another of my Picture Tutorials, so be warned it is a long post and features pictures for every step of instructions.

The inspiration for this originally came from a video posted on YouTube by Dawn Griffith for making a Tea Bag Holder, this was then adapted and after several trial versions I ended up with the version you see here.

To create this Gift Card Holder you will need 2 pieces of Card Stock & 1 piece of co-ordinating patterned paper.

The first piece of Card stock is cut at 23x7.5cm and the second at 8x6.5cm

The patterned paper is cut at 19x185cm

One you have the card & paper cut, put the smaller piece of card stock (8c6.5cm) to one side as it will be used later.

The first job it to score the card stock & patterned paper ready for folding.

Along the 23cm edge of the Card stock score down at 9.5cm, 10.5cm, 20.5cm & finally at 21.5cm.
 
Along the 19cm edge of the paper score down at 9cm & 10cm

Turn the paper round by 90 degrees and then score down at 7cm & 14cm

Fold each of the score lines on the Card Stock

Add Double Sided Tape to the 1cm tab (on the patterned side) and fold along the score lines, this will create a flat tube before you fold the score lines in the middle

Add a small strip of double sided tape between the centre folders of the card stock (make sure that you keep it to the middle and not more than 2cm in length)

Place the folded paper insert into the center of the card stock

Punch 2 holes between the center folders - If you put double sided tape along the length of the centre you would end up with a sticky whole punch

The tape is only to hold the insert in place while you secure it with either: Brads, Eyelets or Ribbon.  In this case I have used Ribbon, but Brads or eyelets both work just as well

Opps, this should have been done before I secured the insert, but I forgot - Using a 1.5 Inch circle punch, cut a semi-circle out of each end of the paper insert, this helps insert and remove the gift tag, gift card or tea bag

To hold the holder closed I used half of a Velcro circle.  It is down to personal preference which way you secure the holder. 

The short tab can either be secured on top of the front (as shown in my picture) or you could secure the front on top of the short tab.  The only difference is how much space you want for the front cover.

It is then down to you to decorate the front of the holder, this one was done for a Birthday and I used some of the patterned paper on the front of the holder as well

Here you see the inside of the holder, the final touch is to insert the smaller piece of card stock that you cut, this will form a card for you to write a message to the recipient of this gift.

Now you have finished the holder it is up to you what you want to put into the 2nd pocket.  My first design was to include a Tea Bag as gift - but I found that the dimensions given in Dawn's video did not work for British Tea Bags (the ones that come sealed in their own little package - like you get in hotels), so I took her idea and ended up with these measurements.

I took one of my prototypes with me to our Wednesday crop and showed it to the others to ask what they thought.  Sue F said that she though she had an idea and disappeared out of the room, when she returned she had with her a this poem...

On Christmas Day
at half past three,
Brew yourself a cup of tea,
And I'll think of you,
While you think of me
sitting by the Christmas Tree.

Sue had found the poem, but did not know what to do with it, other than putting it on the front of an envelope containing a tea bag.

In the end I created some of the holders for gift cards, but also used some to hold Tea Bags, I printed the poem, die cut it out and added it to the card insert.  Unfortunately I forgot to take a phone of these before I had to give them away.

Please feel free to leave a comment if you found this How To helpful.

Happy Crafting.

Wednesday 19 December 2012

WOYWW - 19 December 2012

I think that Whats On Your Workdesk Wednesday is slightly the wrong title for my post this week, it should really be WAYWW (Who's At Your Workdesk Wednesday)...

DH asked if he could use the Pirate Stamps to personalise a Christmas Card for our nephew.  As he had never stamped before I also gave him a quick stamping lesson :)

We had a Christmas Card that was going to be sent from the 'Pirates' who visited 'L' in October/November.  So DH set to work using the stamps both inside the card and on the envelope.


There is just one more WOYWW left of 2012 - I can't believe that this year is nearly over!  It many ways it has just flown by, but in other it seems to have taken forever. 

Well I will hopefully see you the same time next week for the last WOYWW of 2012.

Happy Crafting :)

Monday 3 December 2012

Christmas Cards

A few weeks ago I showed a sheet of images (featuring a pair of Christmas Owls) that were to be used as Christmas Cards.

Over the last couple of weeks I have been trying to play catch-up in making the cards for friends/family, and I think I am winning :)

Here are a couple of examples...
Featuring an Owl stamp (coloured with ProMarkers)  from Little Claire Designs

Featuring the Christmas Stamp from Imagination Crafts (coloured with ProMarkers) and free papers that were with various magazines

Featuring the Polar Bear (free with a magazine last Christmas; also coloured with ProMarkers) & a Little Claire Designs sentiment

Saturday 1 December 2012

How To... Create a Gift Card Holder (2012)

Last year I created a number of Gift Card Envelopes as Christmas Gifts.  This year I wanted to do the same but with a different design.

After looking around on the Internet at various tutorial videos I came up with an idea, it was not based on any one video, but used ideas from a selection of sources.

Here is a sneak peak at the finished Holder - this one is decorated for Christmas, but you could use any colours with any decoration (the possibilities are endless)...


So here is my latest How To... brought to you in pictures. 
Beware: This is a post with lots of pictures!

To create this holder I have used the Spellbinders 'Labels Seventeen' dies, in particular the largest size.

Cut out 2 shapes in card stock, I used a double sided card stock (with the red strips on the front & a cream colour on the back).
You will then need to cut a 1/2 size shape to form the pocket.  As I wanted to pick the patten part of the paper, I used a Post-It note placed over the die to keep it in place while I added the 'C' plate & wound it through my Cuttlebug (many thanks to Dawn Griffith's Videos for this idea).

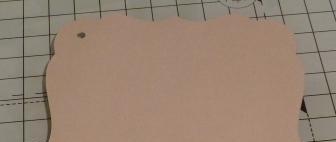
Trim this part piece so that it is only 1/2 the height of the full die.

Put both full pieces together & punch a hole in the top left corner - this needs to be the correct size to fit an eyelet through.

Now it is time to glue the pocket in place, I did several attempts with different types of glue and in the end I found that Pinflare worked the best.  I did not squash the pocket down completely, but left bit of height to the glue.  This then gave me the ability to easily slip the Gift Card into the pocket.

 Place the Pocket into the glue & set aside to dry.

While the pocket is trying you can decorate the front of the holder.  For this one I added a Christmas Tree created using the Sizzix Stamp & Die set.  I also added a simple Happy Christmas sentiment.

Once the glue on the pocket was dry I put the front & back together & fixed a eyelet in place to hold them together - Don't crimp it too tight as you want to be able to twist the front & back round.

With the front twisted round you can access the pocket for the gift card.  Alternatively you could create a fold and use the eyelet like a hinge.

 I ended up making 15 in one session (taking about 2 hours) here are a few examples.


Friday 30 November 2012

New Goodies...

My order arrived yesterday from Ginny (the Stampin' Up Demonstrator) after the Demo evening last Wednesday.

As it fitted with both of us, Ginny delivered the goodies to me at work :)  The down side of this was that I was sat trying to work at my desk, while thinking about what was sat in my car... maybe not a good combination LOL.

So... I decided to use 2 hours of Lieu time and head off home early!!!

I decided to lay all of my new goodies out on the desk & take a picture to share with you all, however I had one problem... I could not see enough space on my desk to put all of the Goodies!!!  This meant that I had to have a clear up (which was really needed!).

Here are all of my Goodies, including: 1 Paper Pack; 2 Stamp Sets; 1 Butterfly Punch; 1 Ink Pad; 1 pack of paper peircing guides (I can't remember the real name for them) Dimensionals & a glue rubber.

The one I am most looking foward to playing with is the 'Lovely As a Tree' stamp set, but in the end I did not get time to start using them this afternoon :(


I already have another shopping list on the go for bits that I want to get, but they will have to wait a few months. I know that the Stampin' Up stuff is not cheap, but the quality of anything I have brought from them is great!!!!

Thursday 22 November 2012

Stampin' Up Evening

Following on from yesterday's WOYWW post we had a great evening with Stampin' Up Demonstrator Ginny Beard.

Due to a lack of space in the conservatory I asked Ginny for a Demonstration using the Stampin' Up Products (rather than a Make & Take event). I must say a very big Thank You to Ginny, her Demos were great and I think we all came away with more ideas for Cards & Projects.

It was a bit of a squash but we all fit into the conservatory :)

This was Ginny's First Demo and when the Gift Holder was completed she filled it with Chocolate Eclairs & gave it to me as a gift :)
Delta & Jumanji also made an appearance during the evening, comming into the house for a quick visit - well that was until Delta decided to discrace himself and poo on the carpet (guess who had to clean it up though!!).  We do say that we have the best spot cleaned carpet in Lincolnshire!!

Wednesday 21 November 2012

WOYWW - 21 November 2012

Once again it is Wednesday... where have the last 2 weeks gone????

So it is of to Stamping Ground for the weekly Whats On Your Workdesk Wednesday, this week will be a very quick post as I have been cleaning like mad.
So why have I taken a picture of a very empty conservatory??  Well later this evening I have booked a Stampin' Up Demonstration, here at my house.  So 7 friends will be visiting for a craft evening.

I already have my shopping list written out, but I am sure there might be a few last minute additions!!

Happy WOYWW.

Thursday 8 November 2012

Opps

We travelled back on the Ferry from Denmark to the UK during Tuesday evinging, arriving in Harwich at 12:30pm yesterday. When we went down to the car deck to start our drive home we found this mess...

The car parked in front of us had not used his Handbrake and during the rough crossing (winds gusting Force 9!!) his car had slide into the one to the right of us and the car to the right of him. Luckly our car was undamaged :)
Opps

Saturday 3 November 2012

Spiderman Birthday Card

This card was created using a Kanban Spiderman - Wall Crawler kit (ref No CON9043), I can't remember where I found it but I just HAD to have one for my Nephew's birthday card.


It was very easy to make, with Spiderman being made up of 4 layers.

Also with the card was a 2nd sheet of Spiderman elements, these will be used to create Table Place Holders on the day of his party (I hope to add photos later) and will complement the Spiderman Plates, Cups & Napkins... well it just had to be done!

Happy Birthday "L"

Wednesday 31 October 2012

Non-Challenge Cards - October 2012

Once again this month I have been concentrating on creating any cards that take my fancy, and not for a specific Challenge.   The cards have been created with anything I had on my desk (usually something I was meant to be putting away!) or just because I felt like it!

So be warned this is a long photo heavy post...

Peacock printed from one of my CDs & decoupaged to give depth.

Owl peel-off and hearts from the 'Build a Owl' punch (Stampin' Up).

Decoupage stamp, butterflies coloured using Brilliance ink pads.

A5 card using embossing folder & image free with one of the card magazines.

Little Clare Die Cut & peel-off.

Embossing folder & peel-offs.

This is my favourite card this month... created with an image which came free with one of the card magazines & peel-off letters for the sentiment.

A very basic card created with a pre-made topper.

Woodware butterfly stamp with 'bling' & card candy mounted on some mirror card stock.
Another version of the Woodware butterfly stamp, this time on a red mirror card stock.

Image printed from the 'Heart of the Garden' CD.

Circles cut from an embossing folder and mounted (2 flush & 2 raised).

The same image as before, just mounted differently.