Followers

Saturday 31 December 2011

My Month in Numbers - December 2011

I have seen several other posts about Months in Numbers but did not really know where to start... then I found Julie Kirk's Month in Numbers Blog pages, which explained all.

After reading her 'Tutorial' I decided to have a go and see how I got on for December, initially it will be a list on my Blog. I thought that it would be a good way to remember what happend during the month using both words & pictures.

So here is...

December 2011 in Numbers

Our Advent Calendar (complete with Chocolates for each day)


24 Chocolates eaten from our advent calender


6 People attended our Christmas Meal, in our team 3 of us work in the Lincoln Office, we decided to all meet (with partners) for a meal out a Toby Carvery.  It does not happen very often but I even got my hairdresser to do something fancy with my hair for a change.  We all had a very enjoyable evening and it gave us all chance celebrate the year that was 2011.


5 Vertebra that were out of alignment when I visited my Chiropractor to sort out my aching back.

57 fence panels, gavel boards & posts. We had been talking for a while about replacing the fence around the back garden, this month we finally got it replaced.  Keith took down the old fence (which was well and truly rotten) and in its place put up a new fence (with 18 new panels).  It does look a lot better and we are pleased with the result.


14 Christmases DH & I have spent together as a couple, although we were apart for 1 Christmas we did celebrate Un-Christmas when DH returned.


12 people playing the 'Parcel Game' on 27th December. While visiting MiL with the majority of DH's family we all sat on the living room floor to play the 'Parcel Game'.  The idea is that you have a large number of small wrapped gifts (no more than £1 each) and 2 die.  All the players take it in turns to roll the die, when you get a 6 you take one of the gifts (if you roll a double 6 you take 2!).  Once all the gifts are gone someone sets a timer to count down - but only they know for how long.  This time when you throw the die if you get a 1 or 6 you get to choose a gift from someone else (or 2 gifts), this continues until the timer goes off.  You often find that one gift is the one everyone wants - this year it was shaped just like a Toblerone. Everyone then opens the gifts to find out what you won.  Once everyone has opened the gifts you are able to swap with others - So if for example you were a boy and received a make-up mirror, you would be able to swap it for something else :) Alternatively if you received a tin of soup you could swap it for a pen/pencil set. 

525 Miles travelled in 3 days (to Devon & back) to visit MiL and DH's family.  During the trip on the road we always have to count something (otherwise I have a tendency to fall asleep while DH drives!!) so during this trip it was Eddie Stobart lorries (21); Caravans (66); Sainsbury's Lorries (39) and 6 Broken Down Cars.


Just One Word - Smile

The Less is More challenge this week is:

JUST ONE WORD
Whatever type of clean and simple card you make, the sentiment must consist of simply one word. 
I guess our card to you would merely say "Thanks ". There are lots of sentiments where a single word can say it all... Enjoy, Welcome, Peace, Joy, Birthday, Sympathy, Love, Thanks etc..

This is my second card for this challenge... Am I on a roll or wot!!!


I think the image for this card is from on of my Little Claire Designs CDs, coloured with my ProMarkers. I decided to matt the image on a wonky background.  For my One Word I used a black pen to add the word 'Smile' under the branch that the 2 owls are sitting on.


Just One Word - Love

The Less is More challenge this week is:

JUST ONE WORD
Whatever type of clean and simple card you make, the sentiment must consist of simply one word. 
I guess our card to you would merely say "Thanks ". There are lots of sentiments where a single word can say it all... Enjoy, Welcome, Peace, Joy, Birthday, Sympathy, Love, Thanks etc..
 
I did create a card before this one, only to decided to not enter it as I felt that there was not enough 'White Space', you can see it here.
 
This is attempt number 2... as well as meeting the Less is More Challenge I will also enter it in the 'I Love ProMarkers' Challenge which has the topic of 'Anything Goes'.


The image for this card is a stamp from Little Musings coloured with ProMarkers.  I then cut & embossed the green background, the card is then finished with the word 'Love'.

Just One Word - But not Less is More!

The Less is More challenge this week is:

JUST ONE WORD
Whatever type of clean and simple card you make, the sentiment must consist of simply one word. 
I guess our card to you would merely say "Thanks ". There are lots of sentiments where a single word can say it all... Enjoy, Welcome, Peace, Joy, Birthday, Sympathy, Love, Thanks etc..
 
So with that in mind I set to work.  Only when I had finished I realised that I could not really enter it into the challenge as it did not meet the Less is More rules - it was a bit too busy, and not enough 'White Space'.  But I liked it, so thought that I would post it anyway.
 
 
This card was created using an image from the 'From the Heart of the Garden' CD.  I mounted it on bronze coloured mirror card and finished with a wooden butterfly & the word 'Thanks'.
 
It was then back on with the thinking hat to try again for a 'Less is More' card!

Friday 30 December 2011

Win 20 ProMarkers from Handy Hippo

As you know, I love my ProMarkers, so when I found this Blog Candy I just had to join in.  The chance to win 20 ProMarkers (of my colour choice) was just too much to resist!!!!


Don't they look Fab :)

So if you want a chance to win 20 ProMarkers then pop over to 'Always with a Heart' and follow the instructions.

Thursday 29 December 2011

Eddie Spotting

During our trip to Devon we were counting the number of Eddie Stobart trucks we saw (doesn't everyone???) and on the way back to Lincoln we happened to pass 'Jade McKenzie'.

If anyone has watched the 'Eddie Stobart - Trucks & Trailers' programmes on Channel 5 'Jade McKenzie is one of the featured trucks (but I can't remember the name of the driver).


This might be slightly sad but for several years I keep saying that I wanted to join the Eddie Stobart Fan Club as when we are travelling down to Cambridge & Devon we see quite a few... well I have finally done it!!!

It is official - I'm an Eddie Spotter!!!!!!!

Wednesday 28 December 2011

WOYWW - 28 December 2011

Wow, this is the last Whats On Your Workdesk Wednesday of 2011.  And as for My Workdesk...


Well it is empty... we got back from Devon just 15 minutes ago and I did tidy my desk before we left - it was not until this morning when I was checking the blogs I follow on my phone that I realised it was a Wednesday today!!!

I hate this week between Christmas & New Year - I totally lose track of all time & days of the week!

Hopefully by next week my desk will be back in a creative state - but I am at work tomorrow & Friday :(

Happy Crafting Wednesday :)

Sunday 25 December 2011

Merry Christmas :)

Merry Christmas to all who are reading this post.

In the 'T' household, DH is about to start cooking the Christmas Dinner - DH is so much better at cooking that I am LOL.

We have had a lazy day and even visited Lincoln Hospital at lunch time to deliver 2 tins of chocolate to the staff on duty at A&E as well as to the staff on the Surgical Emergency Assessment Unit.  We both wanted to say thank you & Merry Christmas to the staff who have looked after DH so well when he has visited both areas with his Kidneys stones.

It is at this time of year that my thoughts also turn to those people who do not have family or friends around them.  Christmas can be such a lonely & depressing time of the year. I also think about those families who are apart this Christmas - especially those in the Armed Services.  May your loved ones come home safe and sound and you get to celebrate a 'Un-Christmas' when you are all together.

I do hope that the Military Wives Choir is able to get the Christmas Number 1 as they are a truly inspirational group of women. Every time I hear the song it brings a tear to my eyes - it deserves to be Number 1.

Once again Merry Christmas & Best Wishes to all.

Friday 23 December 2011

Good Luck

Today is the last day that we will have a 'Rest Room' at my Workplace.  Next year there are other plans and a new building opens with restaurant facilities.  So the lady who has been looking after our food needs for years is moving to a different location from January.

As a 'Thank You & Good Luck' we are getting her some flowers and I have made a Good Luck card:


The picture is not the best but it was difficult trying to get a good photo. 

A couple of weeks ago I brought some Mica Powders & yesterday afternoon I had a play...  this was the result.

I used a clear embossing pad to stamp the butterfly image (from Little Claire Designs) 3 times, I then brushed over the stamped image with 'Pale Blue' Mica Powder.  I then added a couple of butterflies & a Good Luck sentiment from a collection of Forever Friends bits I had left over.

Thursday 22 December 2011

How To... Make a Milk Carton the size that you want

These instructions took some thinking about, but I got there in the end. 

The first thing that you need to do is to decide the width & height of the Milk Carton that you want to make.  During this How To... I am going to use the following sizes as an example: 5cm wide & 10cm tall, all of the measurements for this example will be shown in Red Text.

To start you need to work out the size card that you will need to use, so grab a pen & paper; get out your fingers & toes and I will begin...

For the width:
  1. Multiply the width of your box by 4 (5cm x 4 = 20cm)
  2. Add 1cm to create a tab (20cm + 1cm = 21cm)
For the height
  1. Take the width of your box & subtract 1cm (5cm - 1cm = 4cm)
  2. Multiply this number by 2 - to create the Base & Top (4cm x 2 = 8cm)
  3. Add 1cm to create the tab used to close the box (8cm + 1cm = 9cm)
  4. Add the height of the box (9cm + 10cm = 19cm)
To create by Milk Carton which is 5cm wide x 10cm tall I will need to use a piece of card 21x19cm

Next you need to work out where to score the card, again I found that it was best if I worked this out on a piece of paper:

For the width (the long edge - 21cm)
  1. Score at each multiplication of the width (5cm, 10cm, 15cm & 20cm)
  2. You will then have a 1cm tab at the end of the card
For the height (the short edge - 19cm)

  1. Score at the following points
    1. Width - 1cm (4cm)
    2. Height of your box (14cm)
    3. Width - 1 cm (18cm)
  2. You will then have a 1cm tab left at the end of the card
Now you have your card cut and scored you can follow the same instructions provided to make a Milk Carton from A4 card stock which is found here.

I would strongly suggest that before you make a box out of card stock that you use a plain piece of paper first to ensure that the size of card & score lines are correct. 

It is up to you if you glue the Milk Carton together, I did and then wrote the measurement & score lines on the side for future reference.

Wednesday 21 December 2011

WOYWW - 21 December 2011

I can't believe that the year is nearly over, today is the Shortest Day, in 4 days time it will be Christmas Day and in 10 days time it will be New Years Eve.

Once again it is Wednesday and time for WYOWW - this is what my desk looks like today...


My desk is very quiet this evening, as tonight is Crop night in Lincoln.  However I do have several cards that I need to print inserts for as well as the 'Sticky Stuff Remover' to clean my scissors with.
I have not done much this week on the Craft side, but I have made 2 cards for work.  The first was for a colleague who has been diagnosed with Cancer and is currently of work:

This picture is not great but the wording on the image says... "Where hope grows miracles blossom"  The image came from my new Joanna Sheen CDs - From the Heart of the Garden.
We also had one of the team applying for their own job (it's a long story, but worked out in the end), after being interviewed and told that they had the job we all wrote in the following card:

Made with the paper strips from the Crafts Beautiful magazine & a Little Claire Design sentiment

Wednesday 14 December 2011

WOYWW - 14 December 2011

Only 10 days remain until the Big One... & I'm still making Christmas Cards!!!!

I have sent out all that need to be sent by post (all of which were hand made this year), those that I am doing now are for people that we will be seeing between now & Christmas Day. As I am in a Christmas mood I decided to get a head start on the cards for next year (great planning or wot???).

As for What's On My Workdesk Wednesday - My desk this week is a bit busy...


Ok, I did warn you... the most important thing on the desk at the moment is the Tea! I am freezing!!! 

As part of a 'CAS' selection of cards I decided to use a number of wooden ornaments brought from Create & Craft this year.  One set were Christmas images so using a selection of pens & glitter I have jazzed them up a bit...


Then using my distressing inks I created a background.  Some have snow & sky, others are just a single colour.

So far I have created 4 cards, with more to follow using the ornaments I have already coloured...


Also on my desk is a number of printed sheets from my new Joanna Sheen CDs (From the Heart of the Garden).  One of our team at work has been diagnosed with Cancer, I have been asked to make a card that we can all write in to send our best wishes.  So I thought that as this person enjoys gardening a card featuring flowers would be good.

Happy Wednesday to you all.

Saturday 10 December 2011

10 Things... December 2010

The list that I had planned to do for this month is not yet finished - I'm still looking for the pictures I wanted to use. 

So that will be for next month, as for this month my 10 things are...

10 Things I’m Grateful For…

  1. My Parents – they helped make me who I am today
  2. DH – His love and support makes my world a happier place to be
  3. My Kids (Jumani & Delta) – Give so much pleasure to both me and so many others
  4. My Work – It gives me a reason for getting up each morning, but the fact that I enjoy my job is an added bonus
  5. My Health – I’m healthy and have no health problems
  6. My Anxiety – I am grateful that I have experienced the problems I have with anxiety, as it allows me to help others
  7. Our Home – I have a safe & secure roof over my head which keeps me warm & dry
  8. Holly & Ufo – The 2 birds who got DH & I together.  Both are now flying free in heaven, but despite the pain of losing them, I am grateful for the time that I had with them both
  9. My Friends – Over the years I have had many friends, some have come & gone, others remain.  Those friends have been there for me in the bad times and helped me celebrate in the good times.  After all “Friends are the family you choose for yourself”
  10. The Sea – If I need to chill out & really relax, all I need to do is imagine being on a beach with the waves lapping the shore

Friday 9 December 2011

Christmas Tree Decorations

After the picture of the Christmas Tree this yesterday morning, this post contains pictures of some of the Decorations on our tree.

All of the decorations have memories attached, in previous years we have also added Gold baubles, but this year we decided to stick to a 'Memories Tree'.

So from the top...

Our Christmas Angel

In support of Help For Hero's we have our Christmas Airman

Felt Snowman made by me... the front pocket did contain chocolate money, but it never seemed to last very long

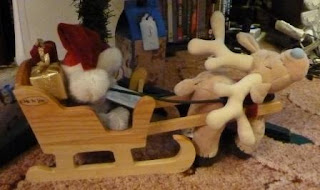
Under the Tree sits our Me-to-You Santa with his Sleigh & Reindeer
Decorations From Holidays Past...

Disney World, Florida 2004

Australia 2005


Nova Scotia, Canada 2006 (Did you honestly think we could have a Christmas Tree without Owls???)

 
Disney World, Florida 2010


Kennedy Space Center 2010

Venice, Italy 2011


Thursday 8 December 2011

The Best Thing About Christmas...

Getting up and going downstairs in the morning to be greeted with this sight...


Our tree is set with a timer to come on just before I head downstairs to make sandwiches/breakfast - I love the warm glow given of by the tree lights.

I will try to take some photo of the decorations during daylight.

Wednesday 7 December 2011

WOYWW 07 December 2011

As it is once again Wednesday it is time for the WOYWW event.

I am being very organised today, on my desk is 3 more completed Milk Cartons (this time made from A4 Card Stock - Click Here to see a How To...for A4 Card Stock, and Here to see a How To... for A5 Card Stock).

I have the card & embellishments ready and waiting to finish the 4th box, I can then fill then all with a selection of sweets & make matching tags - the problem comes if there is any sweets left... do I eat them or not??????


You will also see a CD - Jane Shasky 'From the Heart of the Garden' (produced by Joanna Sheen). I purchased this from Create & Craft on Sunday and it arrived yesterday, so I have not yet had time to have a look at the content - but it did look good on the web site.

Tuesday 6 December 2011

How To... Create a Milk Carton using A5 Card Stock


If you want a smaller Milk Carton you can use a piece of A5 Card Stock...


  1. Take your A5 Card Stock
  2. Along the Long Edge Score down at: 5, 10 , 15 & 20cm
  3. Score a short (3cm) line at 7.5 & 17.5cm
  4. Turn the card 90 degrees clockwise & score  down at 6, 9.5 & 13.5cm
 To make the box follow the instructions for Creating a Milk Carton using A4 Card Stock

Your finished Mini Milk Carton will look like this...

Monday 5 December 2011

How To... Create a Milk Carton using A4 Card Stock

This How To contains all of the details that you will need to create a Milk Carton using a A4 sheet of Card Stock.


Along the long edge score down at 7, 14, 21 & 28cms


Turn the card 90degrees Clockwise (so that the short section is at the bottom) Score down at 6, 14 & 19.5cms


Turn the card back to its starting position. Score a short (3cm) line from the top at 10.5 & 24.5cm

Fold and crease all score lines

Cut away the score lines from the base of the base area and also cut away the narrow side tab

Glue the tab - I use double slided tape with a bit of Pinflair to ensure that it does not come apart

Create a 'tunnel'

Fold in 1 base area and fold the other 3 outwards.  Add glue on the base area folded inwards

Fold one of the other base areas on top of the glue.  Add more glue to the base area, repeat until you have folded all of the base areas inwards

Stand the Milk Carton on the desk with the opening upwards (NOTE: If you have used wet glue only, you many need to sit the carton to one side to allow the glue to dry before you attempt the next step)

Pinch the edges so that the 2 short score lines are folded inwards towards the centre of the box

Secure the top section with a mini Bulldog Clip (or hole punch and thread ribbon through)

You have now got your finished Milk Carton and it is up to you how you go about decorating it.  You also have the extra fun of finding things to put into the carton.

Friday 2 December 2011

66th Birthday Card

This is NOT the 66th Birthday Card I have made, but a card for someones 66th Birthday.

We found out yesterday that it was our Receptionists birthday and that she was 66 years old.  I said that I would make a card for her & after a few discussions about the type of card I was give the following challenge...

Wouldn't it be good to have a card that you could change the age on, after all normally people swap their ages around to get younger, but with 66 could could say you were 69, 96 or even 99 - non of which is any younger than 66!

I sat and thought about how I could achieve changing numbers and came up with this card.


I used 1 number 6 and 1 number 9 stickers and stuck them onto acetate. I then lined them up and put a whole through the middle of the 6/9 numbers.  When a brad was then used to fix them to the mount you are able to rotate the numbers around.

I don't very often make cards for specific occasions (other than Christmas) so found this quite fun to make.  All in all it took about 1 hour.

Thursday 1 December 2011

Advent Calendar

As planned last night I went up into the attic and brought down all of the Christmas Decorations, including my Advent Calendar.

The calendar came from Denmark about 9-10 years ago, it was a fabric kit (with only Danish instructions - which were translated by my SiL) it was the first time I had really used my sewing machine.  This calendar has been used every year since.

Advent Calendar ready to receive chocolates...
Each of the pockets gets filled with 2 individual wrapped sweets, this year we have Celebrations :)

Every evening when DH & I are both home from work we each get a bit of chocolate - I think that it is the best time of the day.

Chocolates ready and waiting to be eaten...

Tuesday 29 November 2011

WOYWW - 30 November 2011

It’s Wednesday again, I just don’t know where the week has gone too.  It is going so quick – I can’t believe that it is December tomorrow.
As far as my workdesk goes I have been busy making Milk Cartons to contain Christmas Presents for the adults in the family.
I have now finished the 6 cartons for the Ladies and will be working on the cartons for the Men today.


This evening I will also be getting the Christmas Decorations out of the attic, the main decorations will go up at the weekend, however as tomorrow is 1 December, I need to get my Advent Calendar out and filled up ready for tomorrow.
I also will be starting work on a How To... for the Milk Cartons, including instructions for how to create a carton the size you want as well as using A5 & A4 card stock.