Followers

Showing posts with label Stamping. Show all posts

Monday, 13 May 2013

Birthday Cards

A friend recently had her 40th Birthday and I wanted to make a special card. In the end I used a stamp from  Imagination Crafts.


I stamped the image onto white tissue paper and then scrunched it up (this did not feel like a good thing to be doing - but I did it).  I then flattened out the image and cut a piece of white paper to go behind the image.  I covered the paper with photo clue and added my tissue paper, after drying with my heat gun I inked the edges with the 'Dusty Concord' distress inks.

The card was finished off with a Happy Birthday sentiment (from Stampin Up) cut with the Window Punch.  I also used the Stampin Up Butterfly punch and added a bit of bling & the number 40.

While I had this stamp out I decided to use it again to create a second card...

This time I used gold embossing powder, the edge of the image was inked with 'Rusty Hinge' distressing ink and each of the butterflies was given a hint of colour using 'Stormy Sky' and 'Fired Brick'.


I was really pleased with both cards, and really must remember to use this stamp again.

Monday, 27 February 2012

I Was Trying To Be Good...

As I am going to the NEC next month I decided that this month I needed to save a bit of money and not purchase much in the way of crafting goodies.

I was being good (Honest!) until I picked up Issue 102 of Card & Papercraft magazine, there on page 53 was an advert for Stampaddicts


Featuring a sweet looking trio of owls (Hear No, See No & Speak No) which I just could not resist!  They feature in the 'Owl Be Yours' set of stamps.

Friday, 17 February 2012

A Lovely Time at LLinda's

As I mentioned on Wednesday I was taking a trip to LLinda's Card & Crafts for another workshop... this time the workshop was 'Take a Set of Stamps' looking at different ways to use stamps.

During the workshop we completed 3 cards, so I thought that I would share them with you all.  All were completed using the same set of stamps from Woodware (sorry I don't know the name of the set):

Technique used: stamping onto patterned paper & heat embossed using clear embossing powder.
Technique used: Fantasy Film & Fibres.
Technique used: Stamping onto glossy card & heat embossing with clear powder, colouring with Sakura Gel Pens (painting with water). centre embellishment using Shrink Plastic.
Once again we had an amazing afternoon of creativity.  I think that my favourite card was the last one, using the Sakura Gel pens to paint with - the colours were so softer than using just the pen on its own!

The bad news was that after the workshop I just had to buy some more bits...
My new purchases include: Shrink Plastic, 'Twist' blade for my Woodware Trimmer, another tube of Collall glue & yet another set of die cut templates 
I can't wait until the next workshop... I don't have any booked at the moment as Linda is due to have an operation on her foot and is not yet sure how long she will be off her feet for. 

But just to keep me going I have put my name down for a full day workshop using stamps from the 'Creative Stamping' magazine.  I now have to be patient (not my best characteristic LOL) and wait for an email with the date.

Wednesday, 8 February 2012

I Love You

I coloured the image used in this card a while ago (it was free with a magazine) & decided that I would use it for 2 challenges this week. 

The colours have not come out very well in the picture, both fish are shades of pink/gray & the 3 hearts are blood red.  I also found some 'beads' with the letters & heart symbol to create the sentiment.


This card is for the following Challenges:

Sweet Stampin' Challenge - The One I Love
I Love ProMarkers - Love is in The Air

Monday, 30 January 2012

Sweet Stampin' Challenge - Animal

Over on the 'Sweet Stampin' Challenge Blog' the topic for this week is Animals.

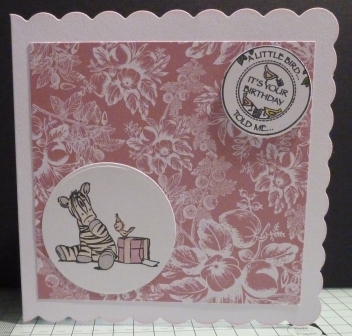
Here is my entry for the challenge this week, I used a stamp which was free with a magazine a while ago, along with a Little Claire Designs sentiment.  The background paper is from Do Crafts.


This is quite a simple card and in some ways I found it difficult to create (especially where to place the zebra & sentiment), but I felt that the colours went together really well.

Don't Forget: If you want a chance to win my Blog Candy click here & follow the instructions - You have until 5pm on the 1st February 2012 to enter, Good Luck.

Friday, 13 January 2012

Lili of the Valley & Tatty Button

My Lili of the Valley has arrived (cheer) the bad news is that I doubt that I will get chance to play during the weekend!


At the beginning of the week I also ordered a Tatty Button stamp which arrived on Wednesday, I did get chance (before going to Weight Watchers) to have a quick play last night.  Here is my first attempt, and I am quite pleased with my colouring using the ProMarkers.


All I need to do now is find the time to sit & play.

Monday, 9 January 2012

Latest Purchases - Samps

Over the weekend I was looking at one of my Card Magazines and found an article featuring the Lili of the Valley stamps. 

I have seen these stamps many times, but they looked so complex to colour & while my ProMarker collection is good, by colouring/blending skills are not!!!!

I have just been very naughty and had a look on the site and made my first order ... I now have to wait for them to arrive.

The stamps I have ordered are:
  • Dreamy Days Sentiments
  • Summer Daydream
  • Big Present
  • Messy Mesages
I have also just ordered a custom 'Handmade By:' rubber stamp featuring my name & email address from Stamps Direct.  I will then be able to stamp the info on each card I create and give to friends/family or charity. 

I had been putting the info on the 'Insert' but it would get in the way or look too busy, this will enable me to stamp the info where I want (either on the inside front/back of the card on the reverse of the insert) .  It was not cheap (£20), but it will be created using the size text & font of my choice, however, I know that it will get lots & lots of use!

Friday, 28 October 2011

Weight Loss & ProMarkers

What a combination :)

Weight Loss
I wanted to mention my progress with losing weight... after losing a bit, putting a bit back on for the last 2 months I think I am now back on track to losing and losing.  For the last 2 weeks I have lost weight (which is great news).

I have known for a while that the key to my weight loss (for me) is exercise, no exercise = no weight loss - however even though I knew this I did not do anything, it was just too hard.  I'm not sure what changed but I decided that I really do want to lose more weight, and to do so would mean doing something!

So, at least 2-3 times a week I have started to take a walk at lunch time, it was something that I was doing occasionally (when I could be bothered!) but I am now trying to make it part of my work day.  As I spend the majority of work time looking at a computer screen, it also means that I give my eyes a break too.  Sometimes it is just me that goes for a walk, but quite often it is our little team of 3 that put on coats and head out into the cold.  The big advantage is that the building feels like a sauna when we return LOL.

The total amount I have lost so far (since January 2011) is.....

31.5lb

ProMarkers
No onto my second topic for this post, I do love my ProMarkers - just in case you did not know, but I do find them frustrating at times.

When I comes to colouring I find it relaxing, and will often sit on the floor and colour while watching TV (well listening really).  I am now able to get a consistent flat layer of colour when I want, and can produce shading by adding more layers of colour.  But... when it comes to blending different colours together I get mixed results. 

Sometimes it goes ok, but most of the time I get a blotchy mess, which is really annoying when you have coloured the whole image in and you are on the last bit!!!!! 

I have watched several tutorials on line and I get the idea, I really do, but I just won't work for me and I don't know what I am doing wrong.  I start with the light shade and get darker, using the light shade to blend the colours as I go.

Next time it happens, I will take a photo of the resulting mess and post it here for comments. 

OK, I have now stopped moaning about my ProMarkers, but I did want to include I picture on this post... This is a Digi Stamp from Little Claire Designs which I printed and then coloured (I don't need to say with what do I???)  however I have fallen in love with this image and really, really love the coloured version.

All I need to do now is decide how to use it!

Thursday, 29 September 2011

Stamp Catalogue

As first seen on Deborah's Gems Blog, I borrowed her idea to create my own Stamp Catalogue. My Catalogue is nearly finished and I though that I would show my 'work so far' along with the way in which I store my Clear Stamps.

This is what 2 of the pages look like from my catalogue.  All images are stamped in Black Ink and the sets are separated by a blue line, each set is then labeled with the Make & where known the set name.


I have done the same sort of thing for the digital stamps, by using PowerPoint to show each image along with the description of either where the images are stored or the collection name & details.


All of my clear stamps are stored in A5 punched pockets.  I was given a box of A4 OHP sheets, so each sheet gets cut into half to create a front & back sheet.  If the stamps came with a reference image sheet this is stuck (using tape) onto one of the pieces of A5 OHP, the stamps are then put on the reverse side and the second piece of OHP is used as the backing.

My stamps are then stored in one of 2 ways, the ones I use the most are in one of two A5 ring binders on the shelf above my Craft Desk.

The rest of the stamps are stored in a A4 Really Useful Box, with a divider to create 2 areas.

My last job is to give each side of this box a name/number and number each of the ring binders.  Once this has been done I can then add the information to my catalogue of the location of each set of stamps.

All I need to remember to do is add each set (Clear & Digital) to the Catalogue when I get them, provided I remember to do that I will be able to find any stamp I want - I hope :)


Monday, 5 September 2011

Angel Kisses

Back on the 16th August I attempted to create a card featuring my Angel stamp (see the post here) I was trying to create an Angel who was standing in front of 2 others, the other 2 were to be almost 'ghost like' - well that was the idea.

After several more attempts I came up with this card

I don't know why this picture is on its side - Blogger does not want to play... But I hope you get the idea (and don't get a crick in your neck!)

I was really happy with the finished card and when I showed it to a friend I did not get it back again!!! So I guess it must have been good LOL.

Does anyone else find that they are over critical of their own cards? Something I might think of as just ok, friends think is amazing. 

Wednesday, 24 August 2011

Card Made With a Gift

A friend was at a car boot sale at the weekend and found a large bag of stamps for sale.  As he knew that I was making more and more cards he decided to buy them. 

Last night I received the bag and had to wait until he had left before diving in to find out what treasures I had been given... there was a wide selection of stamps - most are currently heaped on my desk (WOYWW - Stamps, stamps and a few more stamps!)


I found one stamp featuring a lady that I decided to use straight away... I took a deep breath and stamped straight onto card, after colouring with ProMarkers I was pleased with the result.


Several of the stamps were cast in Rubber and had what looked like EZ Mount fixed to the back. 

It was not EZ Mount - the sticky stuff was not repositionable!!!  I tried to remove it from my stamp block and managed to do so without damaging the stamp. I know have to find the 'Sticky Stuff Remover' that might be in the kitchen to remove the remains of 'stuff' left on the block. I have stuck the stamp to a piece of OHP film until I am able to sort it out.

Quick question time - How can I remove the backing from the stamp so that I can fix 'EZ Mount' to the rubber stamp?????

Tuesday, 16 August 2011

Not Quite What I Wanted...

Once again I had an idea in my head for the Less is More challenge (a 1 Layer Card using Ink), but it did not go quite to plan... I wanted to use an Angel stamp I had and create the impression of 1 main angel, with a couple more in the back ground.

So I got out my Embossing Ink Pad and created a single image, added the Gold Embossing power and heated... so far so good.

I then created a mask of the image and put that over the top of the Embossed Angel.  Inking the stamp again with the Embossing Ink I stamped 2 more Angels (so they would appear in the back ground.

Now for a first attempt it was not bad, but It was not quite what I was looking for!

My 1st Attempt
Attempt number 2... this time I did not use the Embossing Powder, just the ink, this one I did like but the 1st stamped image was not great :(
My 2nd Attempt
For my 3rd attempt I decided to try it on White Paper... The 1st Angel was stamped & embossed in Gold and did look good.  I then tried to use only the Embossing Ink for 2 more 'stood behind' her... the other 2 Angels did not really show up.
My 3rd Attempt
In hind site I should have stoped the 3rd attempt after embossing the Gold Angel... never mind, I guess I can cut her out and use her again on another card.


Wednesday, 3 August 2011

WOYWW - 03 August 2011

As it is Wednesday it is time for WOYWW.

My work area is quite tidy at the moment, as we have been away for 2 weeks I put everything away before we left. 

While we were away I did have a couple of deliveries of items I had ordered & I am now looking at these trying to decided what to use next...

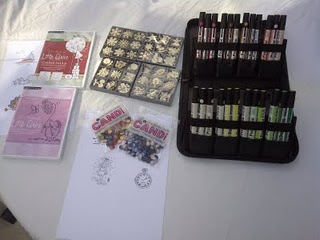
I had orderd 2 CDs  & some Candi from Little Clare Designs (a few images have been printed and are being coloured with my ProMarkers at the moment) as well as some Christmas & Leaves/Fruit/Flowers Wooden Ornaments brought from Create & Craft.

Tuesday, 2 August 2011

New stamps have arrived

Before I went on holiday I placed an order with Create & Craft for a set of stamps called 'Flypast Clear Stamp Set' featuring 14 stamps of the Lancaster, Hurricane & Spitfire.  The stamps are produced by a company called 'Hobby Art Ltd' - although the stamp set is no longer shown on C&C I have found it here on the Hobby Art Web Site.

I ordered the set so that I could attempt to create a few cards/layouts featuring the Flypast aircraft.

Here are my first attempts... I think I will need a bit more practice on the 'Camoflarge' look.


DH thinks my first attempts are not too bad (particularly the top right).  Well I had better get back to cooking dinner!