Followers

Friday 28 October 2011

Weight Loss & ProMarkers

What a combination :)

Weight Loss
I wanted to mention my progress with losing weight... after losing a bit, putting a bit back on for the last 2 months I think I am now back on track to losing and losing.  For the last 2 weeks I have lost weight (which is great news).

I have known for a while that the key to my weight loss (for me) is exercise, no exercise = no weight loss - however even though I knew this I did not do anything, it was just too hard.  I'm not sure what changed but I decided that I really do want to lose more weight, and to do so would mean doing something!

So, at least 2-3 times a week I have started to take a walk at lunch time, it was something that I was doing occasionally (when I could be bothered!) but I am now trying to make it part of my work day.  As I spend the majority of work time looking at a computer screen, it also means that I give my eyes a break too.  Sometimes it is just me that goes for a walk, but quite often it is our little team of 3 that put on coats and head out into the cold.  The big advantage is that the building feels like a sauna when we return LOL.

The total amount I have lost so far (since January 2011) is.....

31.5lb

ProMarkers
No onto my second topic for this post, I do love my ProMarkers - just in case you did not know, but I do find them frustrating at times.

When I comes to colouring I find it relaxing, and will often sit on the floor and colour while watching TV (well listening really).  I am now able to get a consistent flat layer of colour when I want, and can produce shading by adding more layers of colour.  But... when it comes to blending different colours together I get mixed results. 

Sometimes it goes ok, but most of the time I get a blotchy mess, which is really annoying when you have coloured the whole image in and you are on the last bit!!!!! 

I have watched several tutorials on line and I get the idea, I really do, but I just won't work for me and I don't know what I am doing wrong.  I start with the light shade and get darker, using the light shade to blend the colours as I go.

Next time it happens, I will take a photo of the resulting mess and post it here for comments. 

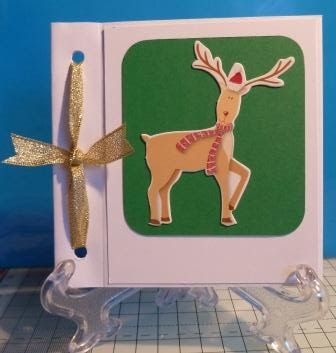
OK, I have now stopped moaning about my ProMarkers, but I did want to include I picture on this post... This is a Digi Stamp from Little Claire Designs which I printed and then coloured (I don't need to say with what do I???)  however I have fallen in love with this image and really, really love the coloured version.

All I need to do now is decide how to use it!

Thursday 27 October 2011

What a Productive Evening

Yesterday evening was extremely productive.

I created 3 more cards :) using various bits that I had left on my Craft Table ready & waiting...

This is a Little Claire Designs Digi Stamp - coloured with ProMarkers and mounted on my Brown Paper (scrunched up and inked with my blending tool)
I must stay that this was extremely easy to do and a great way to release stress by scrunching up the paper :) I then tore the paper to give a soft edge and mounted it slightly wonky - because I could!!

I ended up using fairies and not Angels to try and glitter their wings, and it looks great (I don't know if you will be able to see the glitter in the photo - but it is there) I then mounted her on a Labels 1 matt and added 4 bits of Candi to finish the card
 This was so simple to make & the glitter idea worked really well.

This second fairy had glitter added to her hair as well as her wings, she too was then mounted on a Labels 1 matt, this time it was the same size & twisted by 90 degrees, with a 3 bits of Candi to finish
Another simple card to create and I like the look of the matt being twisted, it almost looks like a flower.

I guess I can now say that my Mojo has definitely returned!!!!

Wednesday 26 October 2011

WOYWW - 26 October 2011

It's Wednesday & I've remembered to take a photo of my Craft Desk this morning for Whats On Your Workdesk Wednesday...


The plan is to use the various bits that you can see. The main 2 things I want to try is to use my glue pen & glitter on the Angels Wings, I have seen it done & it does look good, it is not something I have attempted.

You will also notice some brown paper (this came wrapped around some flowers DH brought for me), again I wanted to try something new - scrunching it up and then using my 'Blending Tool' & Distress Inks to add a bit of colour.

I have also cut some blanks using my Labels 1 die, brought more Calendars for my Calendar Easel Cards & brought a Poppcorn the Bear CD from Create & Craft (only paying the postage) all I need to do now is print some pages out.

So much planned & I have to go to work :( 

Check back tomorrow to find out what I was able to create...

Less is More - Dotty (2)

This week the Less is More Challenge is...

POLKA DOTS
This was my second attempt at the Challenge, and I must say that this is my favorite of the two cards I created... Here is card number 2:

This time I used a sentiment anlong with a couple of 'Dotty' flowers toped with 'Dotty' Candi .

Less is More - Dotty (1)

This week the Less is More Challenge is...

POLKA DOTS
I ended creating 2 cards for this challenge - I was not sure if this one would have enought 'White Space', so decided to try again... Here is card number 1:

I used my embossing folder to create the dotty papper and added a die cut image & sentiment.

Tuesday 25 October 2011

I think it has been found...

My Mojo that is :)

I spent some time at the craft desk this weekend creating a number of cards & a Christmas Envelope Book!  I don't think that they fall into any of my usual challenges so they are not linked, I just liked the way they turned out so decided to post them anyway.

First of all I decided that I wanted to create a Gate Card, and found some Die Cut images that I wanted to use as toppers.  I also decided that I wanted to use some of the 6x6" free papers that keep appearing with various magazines at the moment.


As I was then in the 'Zone' I created my second Gate Card...


The second card I used my distressing ink around the edges of the paper.  To complete each card I needed to use 2 pieces of 6x6 paper, but I did have a strip remaining of each that had not been used.   Sooooo... I decided to use them to create 2 more cards.

Both cards used a white A6 base and were coloured with my distressing inks before adding the paper & topper image.


For my last card I created this one, using a A6 blank I used more free 6x6 paper and then cut out some of the flowers and mounted using Pinflare Gel for dimension...


By this time the ideas were flowing, and I decided to create a Christmas Envelope Book for my SiL - I have only added small photos, just in case she sees this page before Christmas :) 


Instructions for creating this type of Envelope Book can be found here...

I hope you like these cards as much as I enjoyed creating them.

Thursday 20 October 2011

Flower Power

This is the third of 3 entries for the Little Claire Monthly Challenge - the topic for this month is 'Christmas Creations'

This card was also created using Little Claire's Digi stamps, coloured by... yes you guessed it - ProMarkers :)

This time matted on some paper & ribbon.  With a black 'Happy Christmas' sentiment to finish.

Christmas Stocking

This is the second of 3 entries for the Little Claire Monthly Challenge - the topic for this month is 'Christmas Creations'.

I used one of the Digi Stamps for this card, the image was coloured using my ProMarkers.  The sentiment is a peel-off coloured green and mounted using Pinflair Gel.

The most wonderful time of the year...

is the name of one of the Little Claire Stamps.  This card was created using the Digi version of the stamp and added to a card with a touch of gold ribbon.


This is the first of 3 entries for the Little Claire Monthly Challenge - the topic for this month is 'Christmas Creations'

I've Missed WOYWW :(

For the first time since I found the Whats On Your Workdesk Wednesday I missed it :(

What was I thinking!!!  Yesterday was a busy day at work and as soon as I got home things just had to be done (including the pairing of black socks that I had been putting off... and off).

I then had time to find some papers to take with me to the Crop last night.  It was a very good evening with 6 of us attending.  I only completed 1 page (the last from our holiday in Denmark in March 2010) but I was happy with it.

As for the rest of the evening it was spent talking, talking and there was also a bit of planning involved as well.  I have printed a number of photos of our nephew when the family visited us in September, as the photos will go to create pages in his own 12x12 album any text needs to be in both English & Danish.  I have now worked out a numer of titles & what the jounalling is going to say... all I need now is the Danish translations :)

I have also finally finished 3 cards for the Little Claire Monthly Challange and will hopefully get them added by the weekend.

Tuesday 18 October 2011

Lost... My Mojo

Over the last week or so my Mojo has been missing...

Last weekend DH & I visited Milton Keynes for 2 nights and on Saturday we had a great day at Bletchley Park.  I am not going to say too much more as I plan to create November's list of '10 Things' about Bletchley Park.

However it is worth a visit (or two), we did find that 1 day was not enough, so we will be visiting again.

The weekend away seems to have enabled me to find my Mojo again... I just hope that it does not decide to vanish again! 

I actually sat down at the craft table last night and worked on a Christmas Envelope Book and completed another Calendar Easel (to be given as a Christmas Present).  I'm not sure if I will get chance to create/upload photos for my usual card challenges, but I will try.

Sometimes life does get in the way of crafting - I really hate it when that happens :)  I'm off to hope over to a few blogs in my lunch break, work will then be calling.

TTFN & Happy Crafting

Wednesday 12 October 2011

WOYWW - 12 October 2011

It's Wednesday so time for a look at my desk with 'What's On Your Workdesk Wednesday' (also know as WOYWW).

This week has been very quiet on the craft front, I have not felt like sitting down and creating, and when I do I have no idea of what I want to create :(

So here is my very quiet work desk...

I have a couple of toppers for christmas cards that I created, but have not figured out what to do with them yet.  A card featuring another image from Cricuts 'A Childs Year' cartridge - but it does not look good (again not sure what to do with it yet).  And final I have have group of Angels (What do you call a Group of Angels?????) created with 'Little Musing Stamps' and coloured with my ProMarkers - but Guess what?? I' have not decided what to do with them either!!!!

I hope that my idea start flowing again soon as I hate feeling like "I Don't Know!!!"

Tuesday 11 October 2011

More Digi Scrapbooking Pages

All of these Digi Layouts were completed yesterday evening while sitting in front of the TV playing catchup on my recorded programs.

I do need to be in the right mood to sit and create Digital Layouts, however these came together very quickly.  For each of the layouts I started with a blank page and then added the photos I wanted to include.  I then chose digital paper & embelishments to match.

Not a bad for 90 minutes work - I don't think I could have created 3 traditional layouts in 90 minutes!!!!


Monday 10 October 2011

10 Things... October 2011

This month I had planned on doing '10 Things about France'... however due to 'Sidney' (DH Kidney Stone!!) our holiday was cancelled L

So this month we have:

10 Things... I plan on doing this month
  1. Visiting Milton Keynes for the weekend
  2. While there visiting 'Bletchley Park' - Historic site of secret British code breaking activities during WWII and birthplace of the modern computer
  3. and the 'Shuttleworth Collection' - A unique flying collection showcasing the first one hundred years of flight
  4. I will be getting weighed at Weight Watchers & hopefully losing a bit more weight
  5. Having another Crafty evening at the local Crop
  6. Attempting more Less is More challenges
  7. Trying to complete more Digital Scrapbook Pages from our Florida Holiday
  8. Signing up with Lincs & Notts Air Ambulance for their weekly lottery
  9. Going with DH to hospital for another Lythotripsy session (to shatter Sidney)
  10. Waiting for the local children to knock on the door dressed in Halloween costumes

Sunday 9 October 2011

I've no money left!

Today the 'Sincerely Yours' Craft event arrived in Lincoln... Now I've run out of money!!!

The good news is that I went with a shopping list, and I got everything on it... plus a few bits that weren't (opps :) ).

Here are my purchases on the desk awaiting to be sorted and put away... not included here is my best purchase of the day... 24 ProMarkers (and FREE Case) for £37, they have been sorted, colour dotted and put away :)  Many thanks to Designs by TabbyKat who offered the Pens for £1.54 each with the free Case.

Also included in my purchases was a Blending Tool & Pads; More Candi (including White); 2 more Little Claire Designs CDs; 2 more sets of Nestibilities Dies & the Marianne Designs 'Christmas Village'  and many more Bits & Bobs...

Once again there was a great selection of crafts features and it was a great morning out - I now have until May 2012 to save for the next craft event :)

Thursday 6 October 2011

How To... Get your Die Cuts out of the Marianne Creatable Dies

Ok, hands up if you have any Marianne Creatable dies that you don't use because you can't get the paper out when you have used them...  Up to today my hand would have gone up as well.

I was given a tip last night at the crop by a friend (who was told by his friend) that seems to work.  I  have just tried it and guess what? It works!!!!!!

So here goes, these pictures are of my little Cuttlebug, but it should work regardless on the machine you use to cut the dies.

Before we use the die I will show you  how I prepared it...

First I took my glue pen and added a bit of glue around the
fancy edges of the design (I found that this worked best)
Now lay a piece of Non-Stick Baking Paper over the die
Add a piece of scrap card stock and then add the top plate
and run through the machine.
You should then have your die (complete with Baking
Paper insert) and the die cut.
I repeated the same steps with all of my Marianne Creatable dies
All of the die cuts came free from the die without any problems.
I hope that this How To has been helpful and gives you the confidence to use your dies again.

Crafty Evening

Last night was Crop Night... and a very good evening it was too :)

As you may have noticed by now my craft style is very "Less is More" and I don't 'do' fussy and complicated (it hurts my brain too much!)

At the last Crop I started on a layout of my Nephew on his Balance Bike, trying to find any embellishments that fitted was so hard - and ended up being impossible.  So I decided to do something I had never done before... Paper Applique (using paper to build a picture)!!

Using a image of a balance bike (which was the wrong colour) I cut out the different elements (frame, seat, wheels) and used them to create a patten which I cut in paper, add a few buttons and it was done. Here is the finished Balance Bike...


Once I had created my Balance Bike I went on to create the rest of the Layout, and here it is...

Creating the Bike took me about an hour and I then struggled with the words for the journaling, but got there in the end.

The remainder of the evening was taken up with cutting images from the 'My World' Cricut Cartridge, these will be used on the next layout I have started on.

Wednesday 5 October 2011

WOYWW - 05 October 2011

My desk has not seen much activity this last week, but here is a picture anyway...


On the go this week:
  • Printed photos ready to take to the crop with me this evening (and more are still being printed as I type)
  • My latest purchase - Spellbinders Nestabilities 'Labels One Small' (I just HAD to have them... honest!)
  • My LiM card needs an envelope making
  • Images coloured and waiting to be cut out (maybe I will try my Labels One - see, I knew that I needed them LOL)
I'm off now to get some dinner (a visit to the local chip shop) before heading out to Scrap - what a great evening :)

I hope you all have a happy & productive crafting evening too.

LiM - Eye Colour

The Less is More Challenge this week is 'Eye Colour', so as my eyes are brown (with the black pupil) I decided to keep my card to brown & black.


I used a brown card stock to create a A6 sized card, along with a light brown 'Bling' card with a slight glitter look to it.  The fairy image is cut from Black card stock using the Cricut 'A Childs Year' cartridge.  The sentiment was also stamped in light brown.

Tuesday 4 October 2011

I did it!!!

I have just given my first pint of blood.

I did not feel faint, anxious or have any problems :)

Just to prove it here is a picture of my drink & biscuits.


All in all not a bad experience :)

I hate waiting!

Something I have wanted to do for a long while is give blood. However I have 2 issues with that:
- I have a needle phobia
- My anxiety has held me back

I have therefore decided that it was time these no longer hold me back.

Why give blood in the first place? There was a program on TV a while ago about people who had received blood, I decided then that I wanted to do my bit.

So here I am... Waiting. A further update will follow later.

For the Boys

The Ruby's Rainbow Challenge is 'For the Boys'.  I have created this card as a gift for Christmas, the image is a free stamp with a magazine last year.  I then used my ProMarkers to colour the image.

Monday 3 October 2011

Get Distressing

The I ♥ Promarkers Challenge this week is to 'Get Distressing', this is a technique that I rarly use, but I gave it a go and it has worked out ok.


I used some of my stash of 'Core Card' which as remained unused since I brought it.  I used a embossing folder and took a block of sandpaper to sand the top surface, I then used another bit of the card and tore the edge.

The image is a Little Claire Designs Digital Stamp, coloured with my ProMarkers - but I guess you had probably already guessed that :)


All about 'Sidney'

DH & I have been at the hospital today for the 1st appointment to have his stone shattered by Ultrasound (otherwise known as Lithotripsy) the stone is 7.8mm in size and we have seen it on the CT scan they did a couple of weeks ago.

Just because we could we have named the stone 'Sidney', I don't know if anyone else remembers a character calls 'Sidney the Kidney' - at least I think that was what he was called.  I think it was something to do with kidney transplant or fundraising.

Despite being at the hospital all day it was not too bad & DH is feeling a bit sore but not to bad.  On the down side we were due to go to France on a holiday on Sunday... but the consultant has advised us not to travel :(  So tomorrow will be spend making phone calls to cancel our accommodation & ferry booking.

Even though the holiday has been cancelled this will give DH the best chance to get better and he is booked into the hospital again at the end of the month for more treatment to shatter 'Sidney'.

Saturday 1 October 2011

New Dish for Dinner

The other weekend we found a recipe in the Daily Mail which looked really easy so we gave it a go - we did make a couple of changes but it still worked.

Stuffed Chicken & Roasted Peppers & Onions

The recipe showed all of the ingredients being added to one large baking dish, but as we only have 2 smaller individual sized dishes I used those.

Here are the ingredients for 2 people:
  • 2 Peppers (Red & Green)
  • 4 Red Onions
  • 12 Cherry Tomato's
  • 2 Chicken Breasts
  • Garlic & Herb Cream Cheese (Philadelphia or similar)
  • Olive Oil
Method:
  1. Pre-heat the oven to 190oC
  2. De-seed the Peppers & cut into large chunks
  3. Peal the Onions and cut into quarters
  4. Put the Peppers & Onions in the baking dish and drizzle with Olive Oil
  5. Put the baking dish (with Peppers & Onions) in the oven for 10 minutes
  6. Prepare the Chicken Breasts by cutting a slit into the breast and filling with Cream Cheese
  7. Cut the Cherry Tomato's into half
  8. When the baking dish is removed from the oven add the Chicken Breast and Tomato's
  9. Put back into the oven for 30 minutes
Pictured as they came out of the oven.  I served each dish with Potato Wedges & Garlic Bread.