This How To contains all of the details that you will need to create a Milk Carton using a A4 sheet of Card Stock.
 |
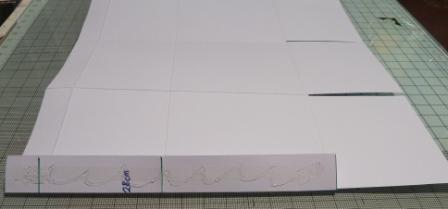
| Along the long edge score down at 7, 14, 21 & 28cms |
 |
| Turn the card 90degrees Clockwise (so that the short section is at the bottom) Score down at 6, 14 & 19.5cms |
 |
| Turn the card back to its starting position. Score a short (3cm) line from the top at 10.5 & 24.5cm |
 |
| Fold and crease all score lines |
 |
| Cut away the score lines from the base of the base area and also cut away the narrow side tab |
 |
| Glue the tab - I use double slided tape with a bit of Pinflair to ensure that it does not come apart |
 |
| Create a 'tunnel' |
 |
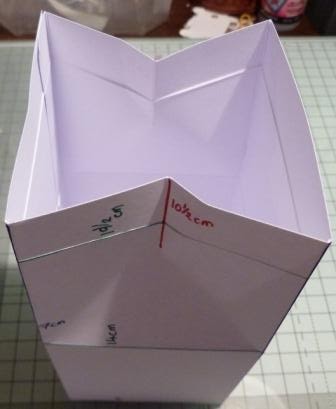
| Fold in 1 base area and fold the other 3 outwards. Add glue on the base area folded inwards |
 |
| Fold one of the other base areas on top of the glue. Add more glue to the base area, repeat until you have folded all of the base areas inwards |
 |
| Stand the Milk Carton on the desk with the opening upwards (NOTE: If you have used wet glue only, you many need to sit the carton to one side to allow the glue to dry before you attempt the next step) |
 |
| Pinch the edges so that the 2 short score lines are folded inwards towards the centre of the box |
 |
| Secure the top section with a mini Bulldog Clip (or hole punch and thread ribbon through) |
You have now got your finished Milk Carton and it is up to you how you go about decorating it. You also have the extra fun of finding things to put into the carton.


That looks good - are you bringing copies on Wednwsday?
ReplyDeletebrilliant I think there may be a few of those made this week LOL- THANK YOU
ReplyDeleteSo clever. They would make lovely gifts
ReplyDeleteGreat idea.It looks good-I may give it a go!
ReplyDeleteFabbie project - thanks for sharing
ReplyDeleteSuch a useful box, thank you for sharing.
ReplyDeleteThis comment has been removed by the author.
ReplyDeletegreat for gifts... Am making some p for my daughters birthday party - as decorated and personalised party bags
ReplyDelete