Once I had figured out the way in which to create a Stepper Card I decided that I wanted one a particular size. After a few attempts that did not work I think I now have it cracked.
What is a Stepper Card? Well it is a card which has a full size section and then smaller steps (usually 3). Here is one I made earlier J
My card has a Full Size section on the left and Steps on the Right, however you could have any combination of Steps and Full Size Sections, here are a few examples.
Here is my explanation for creating my Stepper Card, I have shown my measurements in Blue.
Card Size
The card size will be determined by the size of your steps, so you will need to do a quick bit of maths first, if necessary you can then tweek the size of the steps until you get the finished card size you are after.
1st Step (Smallest ) – decide on the size of your smallest step & multiply by 2 (2cm depth x 2 = 4cm)
2nd Step (Middle) – decide on the size of your middle step & multiply by 2 (4cm depth x 2 = 8cm)
If you add both of these measurements together this will then give you the height of the card (4cm + 8cm = 12cm)
3rd Step (Tallest) – this is the height of your card divided by 2 (12cm divided by 2 = 6cm)
The size of card you will need for your Card will be the height multiplied by 2 (12cm x 2 = 24cm), the width of the card it up to you to decide (17.8cm).
The card blank I used was 5 x 7 inches (12.7cm x 17.8cm) as the height of my steps was 12cm I needed to trim 0.7cm from the height of the card. The width of the card is up to me to decided, I kept it at 17.8cm.
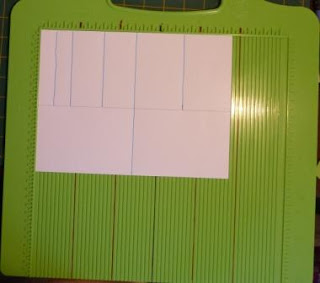
Now you have the size of your card and your step sizes you will now need to decide which Stepper Layout to use… On the back of the card you will be using to create your card you will need to take a pencil and draw the lines to show the border between full size and stepper.
 |
| One half will be a full size card, the other half will be used to create my steps |
I am using my Hougie Board to score as it makes life so easy, but you could also measure and then score.
For each Stepper section you will need to score each of the fold points (I will score at 2, 4, 8, 12, 18cm)… At the middle point (12cm) you will need to score across the width of the card (I have marked my score lines in pen)
Turn your card over and score again on the other side – this will ensure that you can create nice crisp folds on your steps
Next take a ruler and knife and cut along the border between Full Size & Stepper… ensure that you do not cut the first & last scored section (again I have shown this in pen on my card)
Fold the steps and create the main card fold
You are now ready to decorate your Stepper Card
I hope that is How to… is useful and you can now create stepper cards at ‘Any Size’ you want.


This is great, thanks for sharing x
ReplyDeletehi, thank you for this post however I can't get it to work with odd numbers. I've tried a 2, 5 and 7cm step meaning I need a 28cm piece of card, ending up with a 14 cm card - it just won't work. The scoring is not at 2,4,and 10 - but at 2, 4 and 9 and the card doesn't sit straight. Any suggestions or am I just missing a trick! thank you
ReplyDeleteThank you for the maths, Its just what I wanted. X
ReplyDeleteThanks I'll give it a try
ReplyDeleteGracias muy bonito ,lo intentare👍👍👍
ReplyDeletePerfectly described and excellent photos. Very easy to follow, thank you, Helen.
ReplyDeleteThanks a ton!! Congratulations for writing such a concise and clear tutorial! Thanks again 🙏
ReplyDelete